Views: 0 Author: Site Editor Publish Time: 2026-08-24 Origin: Site
Dealing with a malfunctioning car door lock brings significant frustration and potential security risks. Many vehicle owners fall into the costly trap of "parts-canning". They guess the problem and replace components blindly. Modern electronic door locks rely on a delicate chain of hardware working in unison. When one link fails, the symptoms frequently overlap across the system. This makes it challenging to identify the true culprit without a proper diagnostic approach.
Our goal is to clarify the mechanical and electrical differences between the door lock actuator and the interior buttons. By understanding these exact distinctions, you can confidently diagnose the issue at home. You will learn how to pinpoint the exact failure point. We want you to avoid buying unneeded parts. Ultimately, this logical deduction process helps restore your vehicle’s locking system efficiently.
The Switch is the Command: A faulty rocker switch usually results in zero sound or response, often affecting multiple doors if the master switch fails.
The Actuator is the Muscle: A failing door lock actuator typically produces grinding noises, sluggish movement, or intermittent localized failures on a single door.
The Fob Test: If the key fob locks the door but the physical switch doesn't, the actuator is likely fine, and the switch (or wiring) is the culprit.
The Hidden Variable: The body control module (BCM) sits between these two components; widespread, erratic electrical behavior points here rather than individual hardware.
To diagnose a system accurately, we must first understand how it communicates. The electronic door lock ecosystem operates like a basic computer network. It consists of an input, a processor, and an output. By isolating each stage, you remove the guesswork from your repairs.
The interior rocker switch acts merely as a signal generator. When you press the button, it does not send high-amperage power directly to the door lock. Instead, it completes a low-voltage circuit. This sends a simple request down the communication network. A common mistake is assuming a broken button means a broken motor. The switch only asks for an action; it does not perform it.
This electrical request travels to the body control module (BCM). Think of the BCM as the central brain of the vehicle's body electronics. It receives the switch signal and verifies specific safety conditions. For example, it checks if the car is currently moving or if a door remains open. If the conditions are safe, it triggers an internal relay. The module then routes actual 12-volt power down the line to the door.
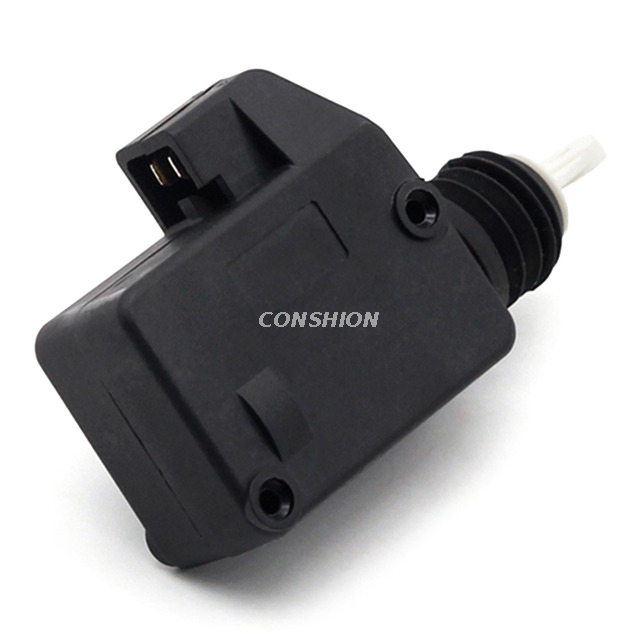
The final destination is the actuator. This is the mechanical motor and gear assembly hidden inside the door panel. It receives the 12-volt power and spins a small DC motor. This motor turns plastic gears, which physically push or pull the lock rod. It engages or disengages the latch securing your door.
Actuator failures represent mechanical breakdowns. Because they rely on physical moving parts, their failure symptoms are highly localized and often audible. Look for these four specific indicators.
Worn internal plastic gears or a dying electric motor create distinct sounds. You might hear a loud buzzing, whining, or grinding noise emanating from inside the door panel when you press the lock button. The electrical signal reaches the motor perfectly, but the mechanical components are stripping or binding. This straining noise is the classic hallmark of actuator degradation.
A weak motor may attempt to move the lock rod but lacks the torque to finish the job. You will notice the lock knob twitch or move halfway down. It fails to fully engage or disengage the latch. Sometimes, it takes two or three presses of the button to force the lock rod into its final position. This sluggish movement indicates electrical power is present, but mechanical muscle is fading.
Hardware failures rarely happen simultaneously across the entire vehicle. If the driver's door refuses to lock electronically, but all three passenger doors operate perfectly, the network is fine. The isolated failure points directly to the single hardware unit inside that specific door. Electrical shorts can cause widespread issues, but a single dead door strongly suggests a failed actuator motor.
Test the physical mechanics. Can you still lock the door easily by pushing the manual knob down? Does the exterior key turn smoothly in the lock cylinder? If manual operation feels normal and frictionless, the physical latch assembly is fine. The failure lies strictly in the electric motor's ability to actuate that latch.
Unlike mechanical breakdowns, switch failures represent electrical input problems. The symptoms contrast sharply with actuator issues. Recognizing these differences saves you from tearing apart a door panel unnecessarily.
A dead switch sends zero power. Therefore, the door remains completely silent when you press the button. You will hear no clicking, no buzzing, and no grinding. The motor never receives the command to move. Total silence indicates an open circuit, often traced right back to the cabin controls.
The driver's side master switch controls the entire vehicle. Passenger switches only control their respective doors. If you cannot lock the passenger door from the driver's seat, but the passenger can lock it using their own door button, the actuator is healthy. The fault lies in the driver's master switch or the wiring harness connecting it.
Your key fob communicates wirelessly directly with the vehicle's receiver module. It bypasses the cabin rocker panels entirely. If the key fob operates the locks perfectly, the actuator is 100% functional. This simple test immediately isolates the issue to the interior cabin button or its direct wiring.
Pay attention to tactile feedback. A healthy button features a crisp, springy response. If the rocker feels loose, sticky, or fails to spring back to the neutral position after pressing, the internal contacts are likely broken or corroded. Spilled drinks, rain from open windows, and daily physical wear degrade these contacts over time.
We need a logical elimination process. Follow this actionable step-by-step framework to determine exactly which part needs replacement.
This is your immediate isolation test. Step outside the vehicle and press the lock button on your key fob. If the doors lock and unlock normally, your actuators and modules are fine. Move directly to replacing the cabin button. If the fob fails to operate the door just like the interior button, proceed to the next step.
Place your ear near the interior door panel of the malfunctioning lock. Press the lock command via the fob or an alternate button. Listen closely. If you hear a faint click or a mechanical grind, the system is attempting to fire. This confirms power is reaching the door, pointing to a dead motor. If you hear absolute silence, you must check the electrical flow.
You need to back-probe the door harness to be absolutely certain. Remove the interior door panel to access the wiring plug connecting to the lock mechanism.
Set your digital multimeter to DC volts.
Connect the ground probe to a bare metal spot on the car chassis.
Carefully insert the positive probe into the power wire of the actuator harness.
Have a helper press the lock button.
If the multimeter reads approximately 12 volts, the circuit is perfect. The motor is dead. If the multimeter reads 0 volts, the motor is likely fine, but power is getting lost somewhere between the cabin and the door.
Advanced diagnostic scanners can read specific body control module fault codes (B-codes). Before buying any hardware, run a scan. The scanner can tell you if the module detects an open circuit, a short to ground, or a loss of communication. This rules out complex network issues before you spend money on physical parts.
Symptom | Fob Response | Auditory Clue | Likely Culprit |
|---|---|---|---|
Single door won't lock; others work. | Fails on single door. | Grinding or straining. | Actuator |
No doors lock from driver seat. | Works perfectly. | Total silence. | Master Switch |
Single door completely silent and dead. | Fails on single door. | Total silence. | Wiring or Motor burnout |
Intermittent locking; random electrical issues. | Intermittent failure. | Clicking from dashboard. | Body Control Module |
Once you identify the failing component, you face purchasing and installation decisions. Understanding the implementation realities helps you choose the most reliable repair path.
You will often face a dilemma: buy just the bare internal motor or buy the entire door latch assembly. The bare motor is significantly cheaper. However, replacing it requires prying open a sealed factory plastic housing. You risk breaking retaining clips and failing to re-seal it against moisture. We highly recommend purchasing the complete latch assembly. It ensures factory reliability, solves gear wear simultaneously, and saves hours of frustrating bench labor.
Labor complexity differs drastically between these two jobs. Replacing an interior button often takes ten minutes. You simply pry up the armrest bezel with a plastic trim tool, unplug the harness, and snap a new unit in place.
Replacing an actuator requires heavy labor. You must remove the entire interior door panel. You then peel back the sticky moisture vapor barrier without tearing it. Next, you must unbolt window guide tracks and reach blindly into the sharp metal cavities of the door shell to detach delicate lock rods. It requires patience and proper lighting.
Part selection matters deeply here. Cheap aftermarket actuators flood the market. They often utilize inferior, brittle plastic for their internal gears. Because replacing this part involves high labor intensity, you do not want to do this job twice. We strongly advise choosing OEM (Original Equipment Manufacturer) parts or premium aftermarket brands for actuators. For a simple cabin button, standard aftermarket alternatives are usually sufficient and safe.
A common mistake is buying the cheapest motor available, only for it to fail six months later during a freezing winter day. Invest in quality hardware for parts buried deep inside the vehicle structure.
Diagnosing failure comes down to testing your inputs against your mechanical outputs.
Mechanical noise points to a failing actuator, while total silence indicates an electrical switch or wiring problem.
Replacing switches is a fast, low-effort task, whereas replacing door latch assemblies requires removing panels and navigating door cavities.
Always verify voltage with a multimeter before discarding an expensive mechanical part.
Stop guessing and start testing. Your immediate next step is to grab your keys and perform the simple "Fob Test" outlined above. This five-second check will immediately narrow down your required replacement part and point you toward a permanent fix.
A: Yes, but BCM failures rarely affect just one door lock. They usually present with simultaneous issues like window failures, erratic dashboard lights, or parasitic battery drains alongside the locking issues.
A: Technically possible by opening the sealed unit and replacing the internal 12V motor or gears. However, the labor-to-cost ratio makes full replacement of the entire latch assembly the standard recommendation.
A: Cold weather thickens internal factory grease and shrinks failing plastic gears. This increases mechanical resistance far beyond what an already worn electric motor can handle.